Installing Treno and Trenissimo
New installation
👷👷🏾Windows PC (standalone)
Install / Update Java
This step requires admin privileges. Please contact your IT department if you are not allowed to install new software components on your PC.
Download and install Java 8 SE. Due to licensing issue, the suggested Java distribution is Amazon Corretto. Please download it from Amazon AWS. For Windows x64 you can use this direct link to the installer: amazon-corretto-8-x64-windows-jre.msi.
The installation procedure is straightforward. 👷👷🏾
Install PostgreSQL
This step requires admin privileges. Please contact your IT department if you are not allowed to install new software components on your PC.
If you are installing Treno on multiple computers, please install the same PostgreSQL version on all of them to avoid potential issues when exchanging databases between different computers.
Download and install PostgreSQL 13. The suggested PostgreSQL distribution is EnterpriseDB. Please download the installer from EnterpriseDB then run it.
The installer will ask you for the admin password. Remember this password, it will be required to connect Treno to PostgreSQL.
At the end of the installation process, skip the installation of Stack Builder.
Install Treno and Trenissimo
Download the Treno installer from TRENOlab then run it. The installation procedure is straightforward. Before starting TRENO for the first time, please run the Treno Updater once. This is also required every time a new user on the machine want to use TRENO, in order to setup the data directory in the user home.
Download the Trenissimo installer from TRENOlab then run it. The installation procedure is straightforward.
Treno and Trenissimo License
If you have a Treno USB dongle, please insert it now in an USB port of your PC.
Run TRENO. You will be prompted to select the license file (file extension .lic).
- Click on Change License.
- In the pop-up window that appears click Load from file
- Select the license file that you receivedm, then click Open
- The pop-up is closed and the license code displayed in the Change license window. Click Validate.
- The pop-up is closed and the License window now shows the "The license is valid" message. Click OK to confirm.
- The License status now appears as Valid. Click Close to start using the software
Run Trenissimo. You will be prompted to insert a license with the same window as Treno. Follow the same steps.
See Treno and Trenissimo licensing for more details and alternative validation options.
Restore a Treno database and a Trenissimo project
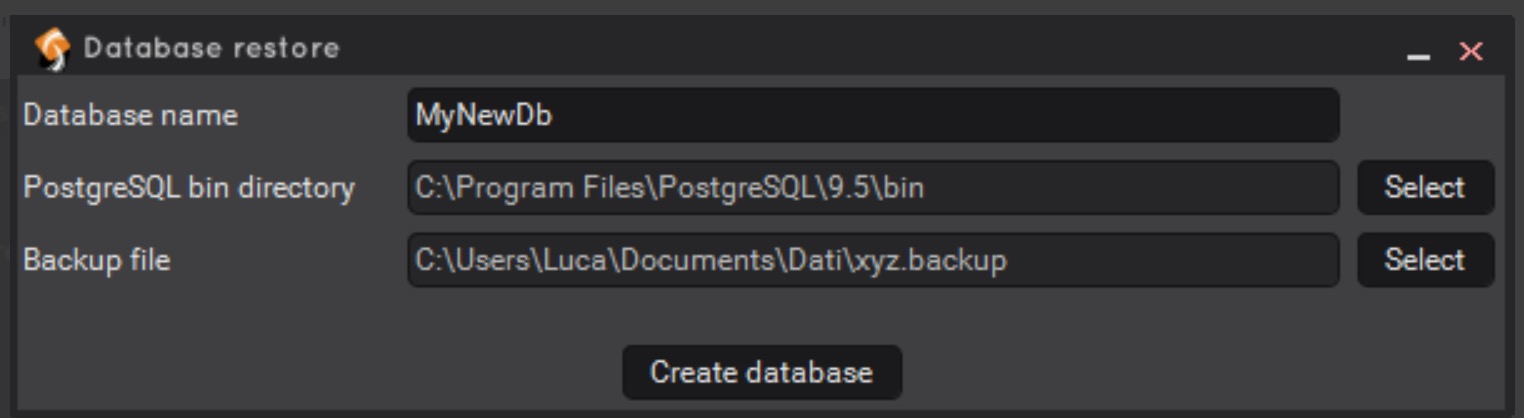
Run Treno. Click Options, Connection, then click Restore database from Backup. Choose a name for the database, select a Backup file then click Create database.
Unzip the Trenissimo project folder on your desktop or in any other location. Run Trenissimo, click File, Open project..., select the project folder, then click Open project.
macOS (standalone)
Install / Update Java
In order to instal and run Treno on macOS, you need to have the Java Runtime Environment (JRE) or Java Development Kit (JDK) version 8 installed. Due to licensing issue, the suggested Java distribution is Amazon Corretto. Please download it from Amazon AWS. For Windows x64 you can use this direct link to the installer: amazon-corretto-8-x64-macos-jdk.pkg.
Install PostgreSQL
If you are installing Treno on multiple computers, please install the same PostgreSQL version on all of them to avoid potential issues when exchanging databases between different computers.
- Download "Postgres.app with PostgreSQL 13 (Intel)" from https://postgresapp.com/downloads.html
- After downloading, open the .dmg file
- Open the image and drag Postgres on Applications
- From Finder, open Applications and double-click on Postgres
- A confirmation message will appear. Confirm by clicking on Open.
- Click on Initialize
- Click on "Server Settings..."
- Select the "Automatically start server" option
- Close the window
If you are installing Treno on multiple computers, please install the same PostgreSQL version on all of them to avoid potential issues when exchanging databases between different computers.
Install Treno
- Download the Treno disk image from TRENOlab.
- After downloading, open the .dmg file
- Open the image and drag Treno on Applications
- From Finder, open Applications and double-click on Treno
- If a confirmation message appears, confirm by clicking on Open.
Install Trenissimo
- Download the Trenissimo disk image from TRENOlab.
- After downloading, open the .dmg file
- Open the image and drag Trenissimo on Applications
- From Finder, open Applications and double-click on Trenissimo
- If a confirmation message appears, confirm by clicking on Open.
Treno and Trenissimo License
If you have a Treno USB dongle, please insert it now in an USB port of your PC.
Run TRENO. You will be prompted to select the license file (file extension .lic).
- Click on Change License.
- In the pop-up window that appears click Load from file
- Select the license file that you receivedm, then click Open
- The pop-up is closed and the license code displayed in the Change license window. Click Validate.
- The pop-up is closed and the License window now shows the "The license is valid" message. Click OK to confirm.
- The License status now appears as Valid. Click Close to start using the software
Run Trenissimo. You will be prompted to insert a license with the same window as Treno. Follow the same steps.
See Treno and Trenissimo licensing for more details and alternative validation options.
Restore a Treno database and a Trenissimo project
Run Treno. Click Options, Connection, then click Restore database from Backup. Choose a name for the database, select a Backup file then click Create database.
Unzip the Trenissimo project folder on your desktop or in any other location. Run Trenissimo, click File, Open project..., select the project folder, then click Open project.
Windows PC (portable)
It is possible to run Treno without installing any other software (except Java).
The procedure is longer and more complex than the (suggested) combination of installing Treno and PostgreSQL, but allows using all functions of the tool.
Preparing the Treno folder on your desktop.
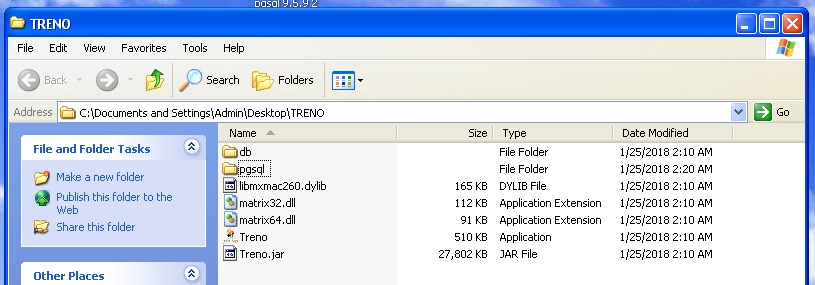
- Create a Treno folder in your desktop unzipping the Treno folder you received. If you can't find it, please contact TRENOlab. The folder must contain (at least):
Treno.jar,Treno.exe,db(folder),matrix32.dll,matrix64.dll,libmxmac260.dylib - Unzip in the Treno folder the
pgsqlfolder you received. Please notice that this folder is different for 32- and 64-bit PCs. If you can't find it, please contact TRENOlab.
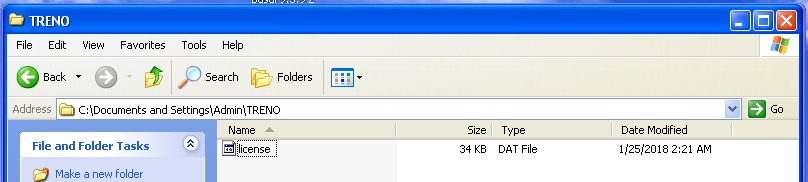
Preparing the Treno folder in your user's home folder.
- Create a Folder Treno in your User root, and insert the license.dat file in it.
Starting, setting and restoring the database
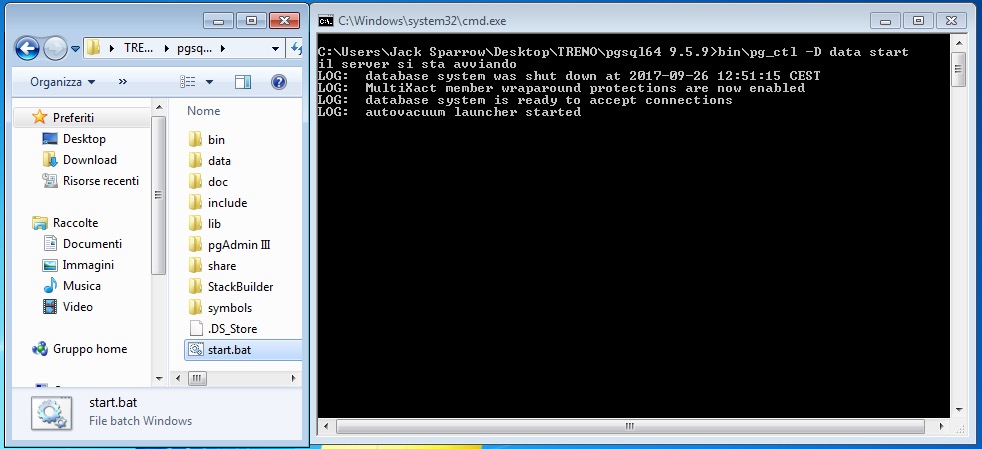
- Run the database. On your desktop, go to
Treno/psgqland double-click on thestart.batfile. Don't close the pop-up window!
- Run PgAdmin, the app used to create and restore the databases. Go to
Treno/psgql/bin/and runPgAdminIII.exe.

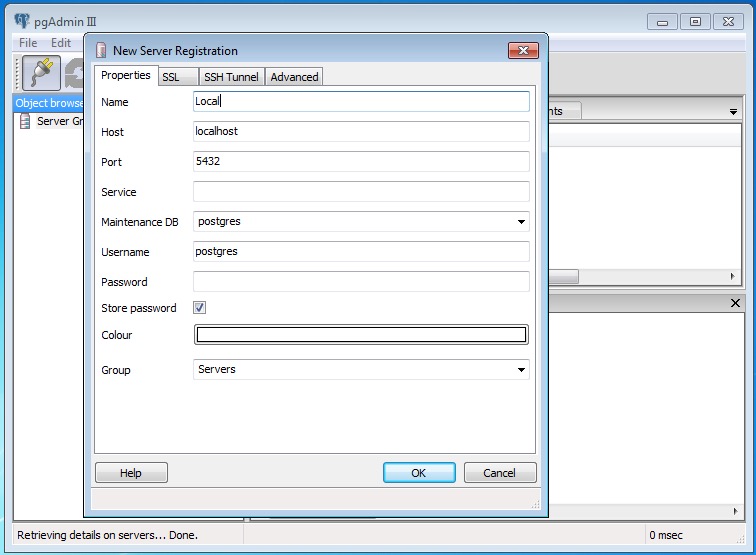
- Create a connection to the server. In PgAdmin, click on the plug (the top-left icon). In the pop-up panel, Assign the settings:
- Name: Local
- Host: localhost
leave all others as default and click OK.
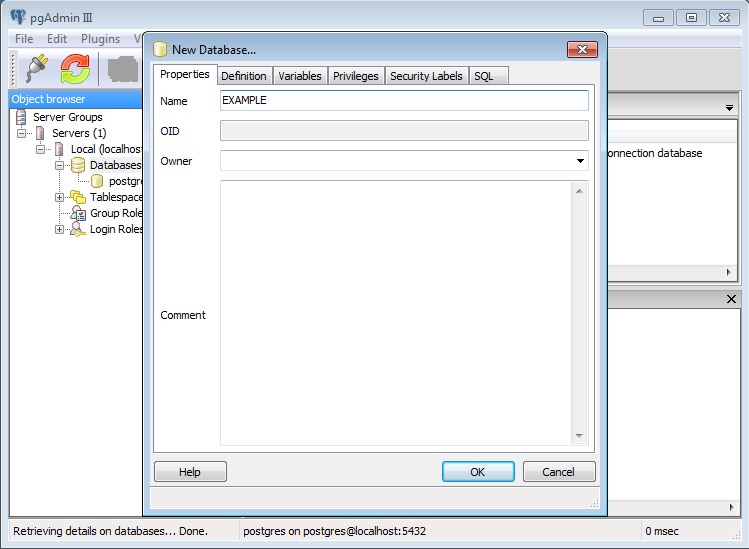
- Create a Database. In the panel on the left, double-click on Servers and then on Local and finally right-click on Databases and select New Database. Assign a name (without spaces) and click OK.

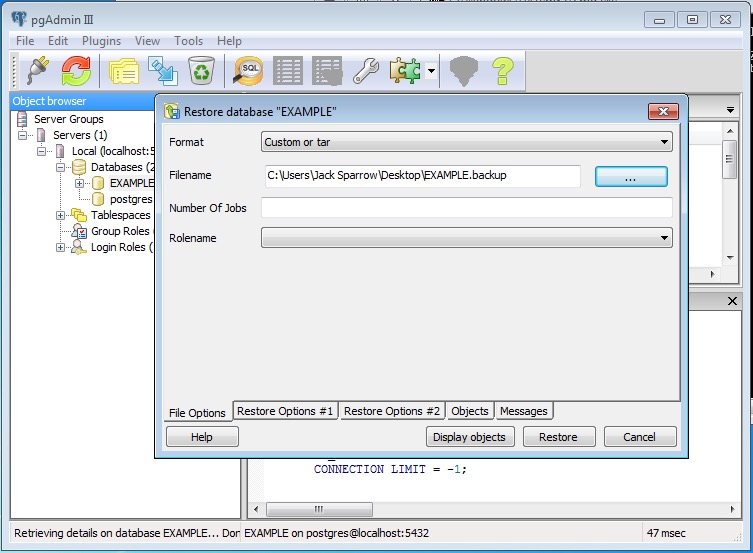
- Restore the database. Right-click on the database you created, and select Restore. Select the .backup file you received. Wait until the operation is completed, a new pop-up panel is displayed. Close it and PgAdmin.

Running and setting Treno (only the first time)
- The database must run in background; if postgresql console is not visible, please run again the start.bat
- Run Treno.exe
- Go to Options → Connections
- Set the parameters as in the screenshot below (loclahost / postgres / (empty)
- Click on Database list and select a database from the top-down menu (EXAMPLE in our case)
- Insert a nickname (YourName in our example)

- Click OK.
- Go to File → Connect
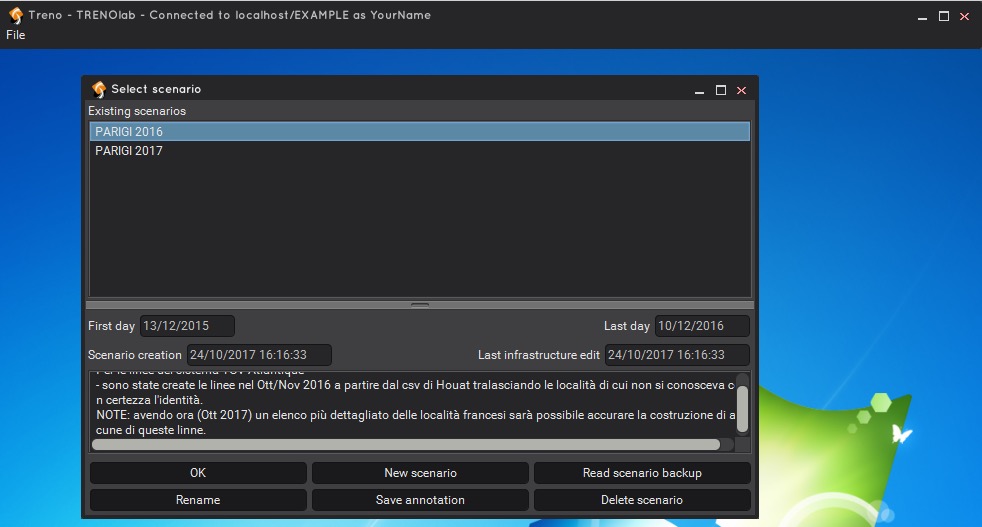
- Select a scenario in the pop-up panel.
Running and setting Treno (all following times)
- The database must run in background; if postgresql console is not visible, please run again the start.bat
- Run Treno.exe
- Select a scenario in the pop-up panel.
Upgrade
👷👷🏾Treno and Trenissimo licensing
To validate the license, the PC must be allowed to connect to licensing.trenolab.com via HTTP (80/tcp) and HTTPS (443/tcp) protocols.
If you get the error message License server not available first ask your IT team to allow HTTP(80/tcp) and HTTPS(443/tcp) TCP connection to licensing.trenolab.com, and then if needed contact us.
The automatic software update services must be allowed to connect to treno.trenolab.com (for Treno) and trenissimo.trenolab.com (for Trenissimo), via HTTP(80/tcp) and HTTPS(443/tcp) protocols.
Pre-activated Node locked license file
If your network setup prevents the activation of a License Key or the validation of a Floating License and also it is impractical to ship you a USB Dongle, TRENOlab may provide you with a Node locked license. This kind of license is tied to a particular PC, cannot be transferred, deactivated or reactivated, and may require the intervention of the TRENOlab support team in case of reconfiguration or replacement of your PC or PC components.
The procedure for providing Node locked license is the following:
- As per the procedure displayed above, the window requiring a valid license will appear when starting the software.
- In its lower part, it shows from one to four different Hardware IDs that identifies your PC univocally. These IDs do not provide any details about your hardware, software or network to TRENOlab or any of its partners. They are only used for license verification purposes.
- Click Copy to Clipboard to copy the IDs to the clipboard, then paste them in a new email message.
- Include the following data: your full name, your email address (if different from the sender address), your company name, and the name of your PC if available.
- Send the email to licensing@trenolab.com
- The TRENOlab support team will process your request in a few hours (Mon-Fri 9-17) then send you an email with a License text file attached. Save that file on your PC.
- Start the software, and wait for the License validation dialog.
- Click Change license, and follow steps 2-6 of the standard procedure described above.
Troubleshooting
Due to the plethora of different system settings in different organisations, after following the installation steps Treno and Trenissimo may not be working. This page illustrates the most common issues that have been experienced and ways to solve them.
Any error message involving Java
Uninstall Java from your computer and reinstall it using the Amazon Corretto version 8 (64-bit is suggested, unless you are using an old 32-bit operating system).
A scenario does not load (the loading animation never ends)
Check the log file (you may find it in %USERDIR%\Treno). It may be due to a memory error (e.g. the program ran out of memory).
The executable file does not correctly call the jar file with the Treno program (opening the .exe file, you get an error message not related to the Java version)
Try opening the .jar file by directly double-clicking on it.
When executing Treno from the .jar file, the RAM allocated by default may be insufficient, possibly leading to Treno getting stuck without any error message.
Thus, we recommend to only test whether the .jar file works by double clicking on it, and then fix the issue in one of two ways:
- (Preferred) Ask your IT team to let the .exe file call the .jar file. It is typically an internal system protection issue (e.g. an antivirus software).
- If the first method is not possible, then you may use the treno.bat launcher that you can download from this link.
Treno is unable to establish a connection with TRENOlab's server to validate the license
If available, try using the USB dongle. Otherwise, ask your IT team to allow your computer connect to https://licensing.trenolab.com/ (tcp port 443).
Treno is unable to download the UK Data Feeds for the timetable auto-update feature
Ask your IT team to allow your computer connect to https://www.trenolab.com/ (tcp port 443).
Unable to restore a database from Treno
First, check that you are specifying the correct /bin folder as illustrated in Restoring a Treno database 👷👷🏾 (.backup).
Despite this being allowed, it is known that having multiple PostgreSQL versions installed on a single computer at the same time may lead to compatibility issues. To solve such issues we recommend having only a single PosgreSQL version installed on your PC. TRENOlab supports any version from 9.5 up to 13. We suggest to download the last 13.x version, from EnterpriseDB.
If you have a single version of PostgreSQL installed, Treno may be unable to access the PostgreSQL directory due to some system/user permission restrictions. The folder-based PostgreSQL version typically solves this issue. Please uninstall PostgreSQL from your PC and use the folder-based PostgreSQL instead. Contact the TRENOlab Team for a customised version of folder-based PostgreSQL.
Forgotten PostgreSQL password
Please follow the procedure illustrated at this link. 👷👷🏾
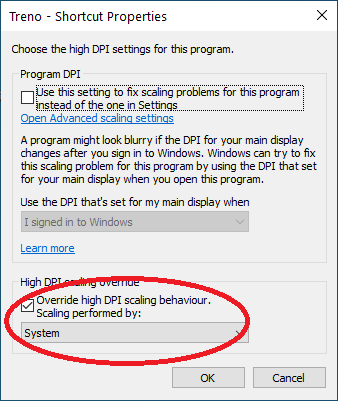
Problems with high resolution monitors
You should change application launch properties by editing compatiblitity properties.
-
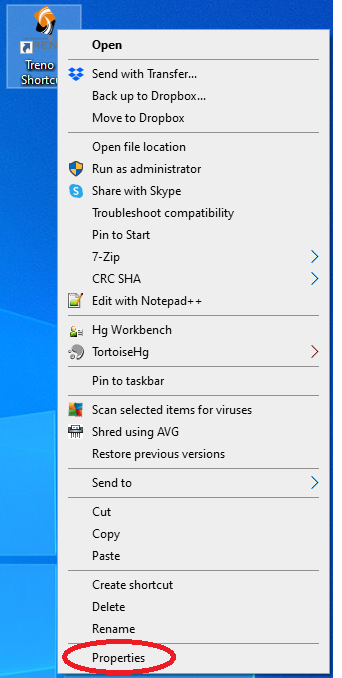
Right click on the Treno icon, then Properties;
-
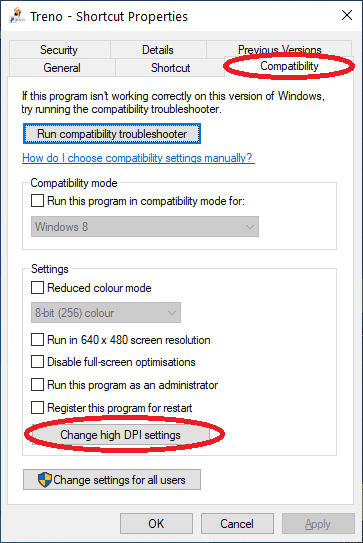
Select the Compatibility tab, then clicl Change high DPI settings;
-
Select Override high DPI scaling behaviour, scaling performed by then System.